Preferred Sizes Tab
This tab is displayed for the Unbound flat - Variable Size template base type. The products using this template have a minimum and maximum size. In this tab, you create a list of predefined sizes that the shopper can choose from, within the range of the minimum and maximum sizes.
The Unbound flat - Variable Size template base type can be used for the following product types:
 | Customizable product (HTML5-based): see “Customizable Product with User-Definable Size” | |
Uploadable product: the uploaded file is scaled to the requested size |
When the Unbound flat - Variable Size template base type is used for an uploadable product, the uploaded file is scaled to the requested size.
Add/Edit Preferred Sizes for Variable Size template
1 On the menu bar, choose Product Templates and select the template you want to edit.
2 Click the Preferred Sizes tab and then the Add button.
 |
The minimum and maximum sizes are displayed in the dialog.
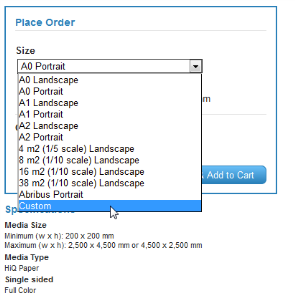
3 Choose one or more predefined sizes from the Size drop-down list which do not exceed the minimum and maximum sizes.
4 Choose the Orientation
•Portrait: 1 size is added to the list with the highest value set for the height (H)
•Landscape:1 size is added to the lists with the highest value set for the width (W)
•Portrait/Landscape: 2 sizes are added to the list
5 Click Save.
The size or sizes are added to the list.
6 Repeat to add additional preferred sizes.
7 Select the Use only listed sizes check box if you do not want to allow the shopper to use a custom size. If you do not select this check box, the Custom option is available for the shopper and a random size that does not exceed the minimum and maximum sizes can be entered.
 |
8 You can change the display sequence of these sizes on the storefront using the Move Up and Move Down arrow buttons, and set the default size with the Make Default button.
 | Make a size the default size on the storefront |
doc. version 6.0.4