Integrating StoreFront with Apogee Prepress/Asanti
Integration with Apogee Prepress/Asanti enables the automatic downloading of orders as they appear in StoreFront. You need to create a special hot ticket and dedicated job ticket templates, and set up communication between the two systems.
How it works
Apogee Prepress/Asanti polls StoreFront for new orders that need to be printed and downloads these orders automatically and according to the specified polling frequency.
A special StoreFront hot ticket imports the StoreFront MJD (Mime packaged Job Definition format) file which includes a JDF (Job Description Format) file that describes the job, and a PDF which is the actual content that needs to be printed. The JDF file specifies the name of a job ticket template that you select in StoreFront to create the job in Apogee Prepress/Asanti.
In StoreFront you can specify this job ticket template for each product in the product template. In addition, a default job ticket template can be defined in StoreFront which can be used as a fallback if no job ticket template is specified in the product template. The product definition in these job ticket templates match the characteristics of the different StoreFront product templates (bound, unbound, flat, folded, etc.). The JDF Server resource in Apogee Prepress/Asanti maps JDF data contained in the StoreFront MJD file to product definition settings that Apogee Prepress/Asanti understands.
NOTE: Please contact your ECO3 representative if you need assistance creating job ticket templates that match the characteristics of your StoreFront products, or to configure the JDF Server resource.
Prerequisites
This feature is only possible with Apogee Prepress 11.0 and higher (Manage or Integrate versions) and Asanti Production 4.0 and higher.
To set this up, perform the following steps in the StoreCenter and in Apogee Prepress/Asanti.
Step 1: Production Settings in StoreFront
1 In the StoreCenter, choose Advanced > Production Settings > Prepress Settings tab.
2 Choose version 9.1 or higher from the Apogee Prepress version drop-down list or version 2.0 or higher for Asanti Production.
3 For Order Handling, choose Automatically download all order items to Apogee Prepress/Asanti.
4 Leave the Default Ticket Template field blank for the time-being.
5 In the Hot Ticket field, enter the name of a hot ticket you will create in Apogee Prepress/Asanti, e.g. StoreFront, without the file extension.
 |
Select the Track Feedback check box to enable an extra button in the Orders tab that can be clicked to see feedback from the workflow system.
6 Click Save to confirm your changes.
 |
Now go to your Apogee Prepress/Asanti application.
Step 2: Create StoreFront Tickets in Apogee Prepress/Asanti
First you create a hot ticket to import the job description and then a job ticket template to create the Apogee Prepress/Asanti jobs.
1 In Apogee Prepress/Asanti, create a Hot Ticket with the name StoreFront which only contains a JDFImport task processor.
An example of such a hot ticket with the name StoreFront is available as a Hot Ticket Template in the Tutorial category in the Apogee Prepress/Asanti client.
 |
2 Open this example hot ticket template and you’ll see that it only contains the JDFImport input task processor.
 |
3 Submit the hot ticket without modifying it, as a new hot ticket with the name StoreFront.
NOTE: The name is case-sensitive and must be the same as what you entered in the StoreCenter Production Settings tab.
4 Now create a Job Ticket Template. Apogee Prepress/Asanti uses these templates to create new jobs from incoming orders. As a starting point, you can use the Job Ticket Template which is provided with your system in the Tutorial category StoreFront Product Template. The following conditions must be met when creating job ticket templates for StoreFront:
•The ticket template must have an input channel Hot Folder and must contain a full production plan.
•Do NOT set the Hot Folder input to just $ORDER because a single order in StoreFront can result in two Order Items which generate two jobs in Apogee Prepress/Asanti. Therefore you should use $JOB, $JOBID or $ORDER\$JOBID (or $ORDER-$JOBID).
NOTE: All possible ticket templates are supported, not only job ticket templates: Job and Hot Ticket templates, Asanti Layout Tickets and Layout Hot Ticket templates.
5 Save the template as a template, for example with the name StoreFront Product Template and select the Make available to StoreFront option in the Save dialog.
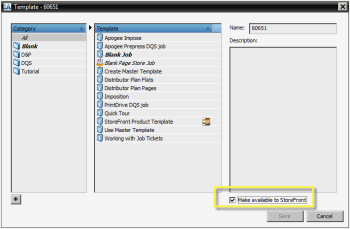 |
NOTE: If you don’t select the Make available to StoreFront option when saving, the template does not appear in the StoreCenter.
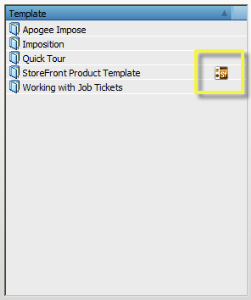
The template is added to the list of templates and a special icon identifies these StoreFront templates.
 |
6 Create additional Job Ticket Templates as required for different types of jobs.
7 In Apogee Prepress/Asanti, go to System Overview and open the StoreFront resource.
 |
8 In the Configuration tab, select the Enable StoreFront Polling check box.
 |
This controls how and when Apogee Prepress/Asanti polls the StoreFront system for new orders that can be downloaded.
9 Enter the StoreFront URL, and the e-mail address and password of the printer account that you use to log on the StoreCenter.
10 Set the Polling Time and configure the proxy server if you have one.
 |
11 Click OK to save your changes.
The connection is established with StoreFront. If necessary, resolve any errors that are displayed.
Step 3: Refresh the Production Settings in StoreFront
1 Go back to the StoreCenter and refresh the page with the Production Settings tab or choose Advanced > Production Settings > Production Settings tab.
The Ticket Templates you just created in Apogee Prepress/Asanti now appear in the Default Ticket Template drop-down list.
2 Choose the Ticket Template you want to use as the default for creating jobs from downloaded order items.
NOTE: The Ticket Template you choose here is a fallback for when you have not specified a job ticket template at the Product Template level. See “Production Tab”.
 |
3 Click Save to confirm your changes.
|
doc. version 6.0.4