Approval Groups
NOTE: This feature may not be included in your license pack.
A workflow can be set up for the approval/rejection of orders placed by shoppers. In its simplest form, approval is performed by the Company Administrator who can approve/reject orders for all the stores assigned to his company.
However, in certain scenarios, a dedicated person in a company (e.g. a department manager) may need to be designated to approve the orders of a subset of users (e.g. a department). In other words, the approver depends on the user who places the order.
This approval scenario is covered by the approval group concept whereby users are assigned to groups within the company. One or more dedicated approvers can then be specified for each approval group.
Setting up an approval group consists of the following steps:
Step 1: Specify approval groups for a company
1 On the menu bar, choose Companies and select the company you want to add/edit approval groups.
2 Go to the Approval Groups tab and click the Add button to add your first approval group.
 |
3 Enter a name for the approval group in the Add Group Label dialog and click Save
4 The approval group name is added in the left column.
5 Add as many groups as you need; select the Keep dialog open check box to work faster.
You now have a selection of approval groups which are currently empty: no approvers and no users.
 |
6 Click Save to confirm your changes.
 |
Step 2: Assign your users to approval groups
1 On the menu bar, choose Users and sort the list by store so you can see the users of the store for which you want to use group approval.
2 Select one of the users and go to the Approval tab.
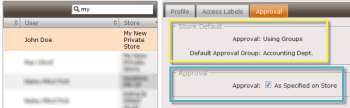 |
The approval mode (Using Groups) and default approval group are indicated in the Store Default panel.
3 In the Approval panel, you can override the store defaults by clearing the Approval: As Specified on Store check box.
You have three options:
•None: orders placed by this user do not require approval
•All approvers can approve: every user with an approval role can approve the orders placed by this user
•Using Groups: orders can only be approved by Approvers of the respective Approval Group
By choosing the latter option, you can assign the user to a different approval group than the default approval group.
 |
4 Click Save to confirm your changes.
|
5 Repeat the procedure to populate the different approval groups.
Step 3: Specify group approvers
One or more administrators or approvers can be assigned to an approval group.
1 On the menu bar, choose Administrators and select the administrator to whom you want to assign group approval, or create a new administrator.
NOTE: This must be an administrator of the company for which you created the approval groups.
2 In the Profile tab, you can choose from the following roles:
•Company Administrator: This administrator can only approve the orders placed by all the users of all the company’s stores. All other operations are disabled in the Orders panel.
NOTE: The Company Administrator does not receive e-mail notifications for new orders. You can promote him to Company Administrator/Approver and then indicate whether he must receive e-mail notifications for the selected approval groups.
•Company Approver: This administrator can only approve orders placed by users who belong to the approval group or groups as specified in the Approval Groups tab for this administrator; applies for all stores of the company. In the Orders panel, this administrator only sees the Approval tab which lists the orders that he is allowed to approve/reject.
•Company Administrator/Approver: This administrator has two Approval tabs in the Orders panel: the My Approval tab lists orders from groups assigned to him; the Approval (All) tab lists all the orders of the company that need to be approved.
3 In the Approval Groups tab, select the group labels for the groups that this administrator is allowed to approve.
 |
The checked labels move to the right-hand panel.
This administrator now belongs to the selected approval groups and is allowed to approve/reject orders placed by users in these groups.
4 Click Save to confirm your changes.
|
Step 4: Define the approval mode for a store
1 On the menu bar, choose Stores and select a store that is assigned to the company you have created group labels for.
2 In the Set Up panel in the General tab, scroll down to the Approval drop-down list.
 |
You have three options:
•None: orders do not require approval
•All approvers can approve: every user with an approval role can approve all orders
•Using Groups: orders can only be approved by Approvers of the respective Approval Group
Choosing the latter option, Using Groups, displays the Default Approval Group drop-down list where you see the approval groups you created.
Choose one of the groups for the Default Approval Group.
 |
3 Click Save to confirm your changes.
|
Step 5: Check your Approval Groups
1 Now go back to the company profile in the Companies tab.
2 Go to the Approval Groups tab.
For each approval group you created earlier, you now see the approvers and users in the right column.
 |
doc. version 6.0.4